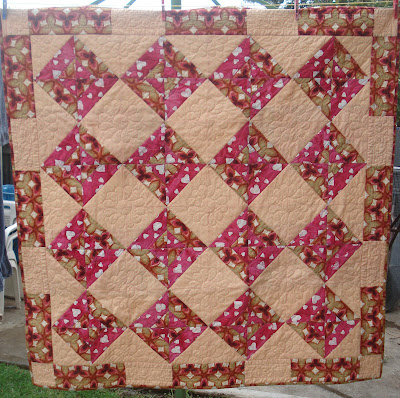
So the lucky UFO number for July was 8 (see here for explanation if you're confused by that statement!).
Now in the interest of honesty this project was not actually my number 8. The reason being that my original project was to use up my rainbow charms I received in an online swap last year. The only problem was that the black fabric I put aside for that project got pulled out recently to use in another quilt! Wouldn't you know its number would come up as soon as I did that! Anyway, I really don't want to buy any more fabric at the moment so I did a quick switcheroo and made this quilt my July project instead. Given that I wanted to give this quilt to my Auntie for her 88th birthday in October I decided its need was more urgent anyway. So with that off my chest, onto the project!
Last year I made a quilt for my friend's mum (who is battling cancer) using this tutorial from Missouri Star. Its called a Tube Quilt and it is truly the easiest quilt I've ever made. All you need are 2.5" width of fabric strips from two different fabrics and 4.5" strips from a third. Each set of strips makes 2 blocks with one quarter of a block left over.
I found some fabric I thought Auntie Betty would like last year and put it aside for this project. There are a few options on how you put the blocks together so I experimented a bit with the layout.
This is the layout I used for the one I made last year - see photo of that quilt at the end of this post :
or this zig zag or chevron style layout is another option:
but I didn't feel it was really Auntie Betty's style.
This was my preferred layout in the end:
This quilt whips up so quickly so in no time I had it all stitched up!
While I managed to get this quilt sandwiched I lost a bit of sewing time this month due to a busy schedule so it isn't quilted yet. I have a plan of what I want to do though so hopefully it won't take too long. I might even take it with me to a sewing retreat weekend I have coming up at the end of August if I don't have it finished by then.
This is the quilt I made last year using the same method but a different layout and slightly less blocks:
I wasn't entirely happy with my fabric choices on that quilt but I'm much happier with the combination of fabrics this time around!
Thanks for visiting my blog today,
Monday, 29 July 2013
Friday, 26 July 2013
Star Surround Quiltalong - Cutting the Fabrics!
I'm joining in with Melissa's Star Surround Quiltalong at Happy Quilting
and have decided to make a lap quilt using 16" blocks. That means I'll need to make 16 blocks and needed a fat quarter of 16 different fabrics. I had a bit of a plan to use my stash of Notting Hill fabrics and some blenders but still had to have a good dig around in my stash to find the right mix of fabrics.
This is what I selected:
So this week I have been working on turning those lovely fabrics into these:
This is the first time I have ever cut up all the fabrics for a quilt at the beginning. I usually cut fabric as I need it and I think its a system that works for me. I have found that even though I spread the cutting out over multiple sessions over three days my left hand is a little unhappy about it. I'm glad its done now though and I'm looking forward to next week when we start putting it all together!
All that cutting left me with quite a large pile of these:
Along with some odd leftovers for the scrap bags!
I love that leaf fabric, it almost looks three dimensional. I've been looking for the right project to use it in and and now its time has arrived!
Thanks for visiting my blog today,
Tuesday, 23 July 2013
2013 To Do List Update
I just realised we are more than halfway through the year so I guess its time to revisit my goals for the year to see how things are progressing. Thanks to the 13 UFO's in 2013 quiltalong at Aunt Marti's 52 Quilts in 52 Weeks I have been really cracking on with this!
Thanks for visiting,
Make curtains for Auntie Betty before end of January when she comes back from WA!DoneNative wildflower quilt/wallhanging (partly quilted)- finish quilting and bindDone- Rainbow quilt with rainbow charms from Quilt Club Australia charm swap - used some of the fabric I had put away for this so need to buy more solid black!
Star Quilt - sandwich, quilt, bind and use! (This quilt is for me - the first one I've made especially for me so I want it done before next winter!)- Continue piecing hand stitched blue Cathedral Ceiling quilt - long term project for our room - no rush on this one! Going well, 10 more blue blocks and 31 yellow blocks to go.
Pillow for Kieran using leftover Chinese symbol to go with his dragon quilt.DonePillow for Simon using penguin fabric I bought online too long ago.Done + extra pillow for hubby as well!Doggy quilts for Molly before old blanket falls apart.DoneBag each for Kerry and SueDoneMake some more card wallets for Christmas presents to match bags for Kerry and Sue. Done- Bag or other project for Vanessa using Union Jack made to test Molli Sparkles' tutorial. - Perhaps in time for her birthday in September? Not started yet but have a plan to use it for a passport wallet this month
- Crumb bocks from tiny scraps -maybe on sewing retreat in
March? Rescheduled to end August! - Rainbow string blocks or other scrap project -maybe on sewing retreat in
March? Rescheduled to end August - Quilt for Auntie Betty - tube quilt? - for birthday in October - Nearly done, top & back made, ready to put sandwich together this week hopefully
- Mariner's Compass quilt using ruler set bought in 2011!
- Shadow Trapunto Quilt from Geta Grama's book
- Scrap quilt using mixed charms from swaps and my scrap squares
Native floral table runner - maybe to send overseas(?)Done, ready to send for Christmas!- I Spy quilt - long term project as not needed at the moment
- Christmas Charms - project to use them on - placemats?
- Baby quilt using Peter Rabbit squares - just because they're there and need using. Donate somewhere?
- quilt Something New Sampler from quiltalong earlier in the year for Vanessa for Christmas
- And Sew On BOM on Quiet Play blog - only 2 blocks to go!
- Quilting Block Swap Australia blocks received - make into a quilt - Underway, top nearly finished
- I have also decided to join in on the Star Surround Quiltalong starting last week - because too many projects is never enough!
Thanks for visiting,
Monday, 22 July 2013
QBSA - July Block
My partner for July was Kate in Blacktown NSW. She requested any star block in black and white.
I first made this block for my Stars Aligned quilt:
and thought it would look great in black and white. What do you think?
Its called Another Star and you can find the tutorial for it on Fresh Lemons blogspot here.
My QBSA partner in June was Michell in New Zealand and she sent me this lovely block this week:
Its the first one of my new block choice. Thanks Michell!
Thanks for visiting my blog today,
Sunday, 21 July 2013
Sunday Stash ( or Oops I did it again!)
Well I have been behaving myself with fabric buying this year but when Equilter.com were having their big end of year clearance I just couldn't help myself. I decided to be sensible and I bought some nice co-ordinating blenders in colours I was a bit understocked on.
Then of course the dreaded Spotlight fat quarter sale (who can say no for $1 a fat quarter) could not be ignored. (I apologise for the slightly dodgy photos but it was a very dark, rainy day here when I took these!)
I have a few nice pieces of Notting Hill lurking in my stash waiting for their time to shine:
so I picked up some goodies which I thought would play nicely with them. I'm thinking of joining in with the Star Surround quiltalong at Happy Quilting and I think these might be just the thing!
These Cuzco Exotic Garden goodies are just gorgeous:
I'm sure you noticed the odd one out in my first photo there in my grab for fabric? Its a batik and it made it in simply because it has birds on it. My husband is a finch lover and there is not a lot of fabric around with finches on it. Now this bird is not strictly speaking a finch (in fact it looks more like a spoggie*) but it looks a like a small bird (rather than a large parrot as most fabric seems to favour) so that was good enough for me! I don't know what I'll do with it but for now owning it is enough, its time will eventually come.
* sparrow in non-slang vernacular!
The fat quarters I also selected with the plan of building blenders in my stash.
I added a couple of nice greys,
a bit of black and white
and I know you noticed that delightful (!) flag fabric lurking there.
Why you ask? This one has a purpose - I'm going to make a passport holder (or possibly two) as a gift in the near future and this one just screamed passport to me. I'm thinking it may feature on the inside, perhaps on a pocket but either way it just seemed to fit!
Oh and not to forget the Prints Charming! You might have noticed I really like this one, given I bought four of the same!
Still need to stock up on solid black as I used up what I had stashed for another project but I didn't think of that when I was at Spotlight did I? Next time (won't that make an enthralling Sunday Stash post)!
Thanks for visiting today!
Tuesday, 16 July 2013
Block Testing for Kristy
Okay, I have been somewhat lax of late in posting what I've been up to. In my defence, however, I offer up the fact that my computer is slowly dying and has a nasty tendency to shut down without warning. So sometimes I have wanted to post but have given up after it has shut down at the wrong moment and I've have thrown my hands up in the air and sworn and stomped off. Today, however, both the computer and I seem to be in the mood for some blogging so I am whipping up posts while the computer smiles upon me!
So back to this block! Kristy at Quiet Play is on a bender at the moment making a stack of LEGO character blocks for a quilt for her son. She was after some block testers so I volunteered to give Wonder Woman a shot and here she is (cue music 'WONDER WOMANNNNN').
First, the TV Wonder Woman, Lynda Carter:
Image from http://entertainmentnutz.com/post/wp-content/uploads/2011/02/Lynda-Carter.jpg
and the fabric LEGO version:
Not too bad I reckon! I have a loose plan to turn this into a cushion for my bestie's 50th birthday in September. She's a bit of wonder woman, she never stops moving! Be assured I will share a photo if I do, I just can't promise it will be posted straight away!
Kristy is a whiz with paper piecing designs so if you're interested in checking out her LEGO characters (available free in her Craftsy shop), or some of her many other great designs, you can find them here. You might like to head over to her blog to keep tabs on the new blocks as they are designed too.
Thanks for sharing Kristy,
Monday, 15 July 2013
And Sew On - July Block
July's block was another good one - focussing on the trusty rotary cutter. Wouldn't be without mine! Of course the ruler gets a a bit of focus too as one's not much good without the other.
I decided to use the deep blue I have been using for quite a few of my blocks as its very similar in colour to my cutting mat and if you have a rotary cutter and a ruler you know you need a cutting mat, right?!
As is always the way with these things, of course I only noticed the error I made after I looked at the photo. Its minor so I'm not going to change it but the back block should be a little shorter than the front one and mine are the same length. Didn't label my foundation properly there I guess!
My favourite ruler is my fluoro green Matilda's Own 12.5" square ruler and as I happened to have some green in a similar colour, I decided to use it for my ruler. Pretty happy with the way that came out.
The hardest fabric to find for me was the grey/silver for the blade - no silver or plain grey in my collection so what to do? Not sure if you've ever tried it but sometimes the back of a fabric can be just the colour you're looking for, so I flipped a few over and found the right look I was after.
This blue fabric on the right side of the photo below:
So next time you're having trouble finding just the right fabric, check the back of some of your fabrics and you might just have the perfect one there already!
Now best go and link this blog post up over at Kristy's blog!
Thanks for visiting my blog today,
I decided to use the deep blue I have been using for quite a few of my blocks as its very similar in colour to my cutting mat and if you have a rotary cutter and a ruler you know you need a cutting mat, right?!
As is always the way with these things, of course I only noticed the error I made after I looked at the photo. Its minor so I'm not going to change it but the back block should be a little shorter than the front one and mine are the same length. Didn't label my foundation properly there I guess!
My favourite ruler is my fluoro green Matilda's Own 12.5" square ruler and as I happened to have some green in a similar colour, I decided to use it for my ruler. Pretty happy with the way that came out.
The hardest fabric to find for me was the grey/silver for the blade - no silver or plain grey in my collection so what to do? Not sure if you've ever tried it but sometimes the back of a fabric can be just the colour you're looking for, so I flipped a few over and found the right look I was after.
This blue fabric on the right side of the photo below:
became this nice mottled silver/grey for my blade:
Now best go and link this blog post up over at Kristy's blog!
Thanks for visiting my blog today,
Monday, 1 July 2013
My Other Hobby
As well as being obsessed with quilting I also volunteer as a Trees for Life grower. Trees for Life is a South Australian organisation in which volunteers grow trees for landholders and revegetation projects to help regenerate SA and conserve remnant vegetation. I initially got involved quite a few years ago and grew trees for about 3 years before I returned to work, getting busy volunteering with other projects and putting it aside for a few years. I started again about 7 years ago and have been growing for the same landholders, Andrea and David, every year since then, as well as other landholders as Andrea and David have required less trees as the years have gone on.
Each year I grow between 6 and 8 boxes of native seedlings and everything is provided by Trees for Life, all you provide is the time, space and effort for around 6 months. The instruction book is great and really answers all your questions but Trees for Life are always available with advice over the phone if you get stuck. The seed for the trees is collected from plants in the region in which the seedlings will end up so the trees are specific to their area and can vary quite a lot between regions.
These are the trees I grew this year for Andrea and David, who live near Gladstone:
These are the 6 boxes I grew for Ruth, whose farm is near Jamestown. This is the first year I have grown for Ruth and she is revegetating some new land she acquired adjacent to her property which is nearly devoid of trees. As they had received some rain at last, Ruth's husband John came and collected their plants in late May so she could get them into the ground as soon as possible.
Last year Andrea and David very generously gave me a voucher for a night in a local B&B as a thankyou so last month we booked an extra night and drove up to Gladstone to visit them and also to see how the trees we had grown previously were doing. It was a lovely B&B called Conyngham Cottage and it was a beautiful cottage. I would recommend it if you're ever up that way and need somewhere to stay. Very reasonable rates, very comfy and quiet. I might have to do another post about the cottage with more photos!
Before heading out to Andrea and David's, we drove to the other side of Jamestown to meet up with Ruth and have a look at her property. Unfortunately it was so wet that day we weren't able to go out in the paddock to see the trees which had already been planted but it was lovely to meet Ruth and see her plans for the new land. This is the section of land which she is planting out:
As you can see, not too many trees there. It doesn't look too bad in this photo but there was a fine misty rain falling all morning. There's actually another row of hills back there behind the ones you can see! One of those rains that wet you right through and you don't feel it! Oh, and it was cold!
After lunch we headed out to Andrea and David's place and started by driving around their property to see the windbreak they planted out in 2007 & 2008 with trees I had grown. This is a photo of the trees in 2009 when we visited the first time (with Andrea doing a bit of straightening up!). Believe it or not it was actually raining that day too for the first time in about 6 months, although it doesn't look it.
My hubby Brian looking over the trees!
This year it was really raining properly and as with Ruth's property, we couldn't go to the same spot as the above photos were taken but rather we drove up to the top of the hill and looked back down. This is a photo from there:
Here is a closer look, the photo isn't too good given there was a lot of rain falling and it was getting dark - the sheep were a bit confused about why there was a flash going off I think (that's how dark it was at 3pm in the afternoon!).
Andrea told me that if Brian had been able to stand next to the same plant now it would be over his head! (even though they don't look that big in this photo). Some of my trees have been planted in other areas around the farm, mostly along the river to revegetate the banks. Its nice to think that I've been partly responsible for all those trees growing and doing their bit!
We stayed for dinner and had a lovely evening of friendly chat. They're a lovely couple and are really working hard to revegetate their property. Another property adjacent to theirs looks very barren in comparison.
I really get a lot of personal satisfaction from growing the trees. Its nice to think that my trees will be there for many years to come!
I had a laugh when I walked through the B&B and saw this little beauty sitting there:
Shame I couldn't take it home with me!
Each year I grow between 6 and 8 boxes of native seedlings and everything is provided by Trees for Life, all you provide is the time, space and effort for around 6 months. The instruction book is great and really answers all your questions but Trees for Life are always available with advice over the phone if you get stuck. The seed for the trees is collected from plants in the region in which the seedlings will end up so the trees are specific to their area and can vary quite a lot between regions.
These are the trees I grew this year for Andrea and David, who live near Gladstone:
These are the 6 boxes I grew for Ruth, whose farm is near Jamestown. This is the first year I have grown for Ruth and she is revegetating some new land she acquired adjacent to her property which is nearly devoid of trees. As they had received some rain at last, Ruth's husband John came and collected their plants in late May so she could get them into the ground as soon as possible.
Before heading out to Andrea and David's, we drove to the other side of Jamestown to meet up with Ruth and have a look at her property. Unfortunately it was so wet that day we weren't able to go out in the paddock to see the trees which had already been planted but it was lovely to meet Ruth and see her plans for the new land. This is the section of land which she is planting out:
As you can see, not too many trees there. It doesn't look too bad in this photo but there was a fine misty rain falling all morning. There's actually another row of hills back there behind the ones you can see! One of those rains that wet you right through and you don't feel it! Oh, and it was cold!
After lunch we headed out to Andrea and David's place and started by driving around their property to see the windbreak they planted out in 2007 & 2008 with trees I had grown. This is a photo of the trees in 2009 when we visited the first time (with Andrea doing a bit of straightening up!). Believe it or not it was actually raining that day too for the first time in about 6 months, although it doesn't look it.
My hubby Brian looking over the trees!
This year it was really raining properly and as with Ruth's property, we couldn't go to the same spot as the above photos were taken but rather we drove up to the top of the hill and looked back down. This is a photo from there:
Here is a closer look, the photo isn't too good given there was a lot of rain falling and it was getting dark - the sheep were a bit confused about why there was a flash going off I think (that's how dark it was at 3pm in the afternoon!).
Andrea told me that if Brian had been able to stand next to the same plant now it would be over his head! (even though they don't look that big in this photo). Some of my trees have been planted in other areas around the farm, mostly along the river to revegetate the banks. Its nice to think that I've been partly responsible for all those trees growing and doing their bit!
We stayed for dinner and had a lovely evening of friendly chat. They're a lovely couple and are really working hard to revegetate their property. Another property adjacent to theirs looks very barren in comparison.
I really get a lot of personal satisfaction from growing the trees. Its nice to think that my trees will be there for many years to come!
I had a laugh when I walked through the B&B and saw this little beauty sitting there:
Shame I couldn't take it home with me!
Subscribe to:
Posts (Atom)